Solder Fume Extractor
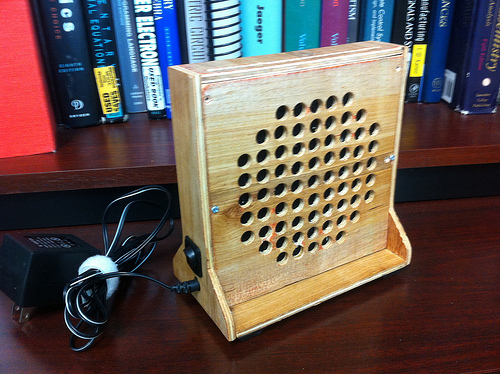
For years I have been soldering when I ran across a tutorial that informed me that soldering fumes are toxic. And I always just thought the smell was simply annoying. The fumes do not contain lead, but they are from the resin evaporating. Still, they are toxic. So, I looked into a solder fume extractor. A commercial fume extract is $50 USD. Not too bad, but wouldn't it be more fun if I made one? I saw kits for DIY fume extractors, but nothing that really suited me. So, I designed my own.
Most of the design is the box, which I drew in SketchUp, but I also included the schematic (a 12V wall adapter, a toggle switch, and a fan) which is so embarrassingly simple, I almost neglected to post it. First, I cut out each piece with the table saw. Then I rough cut the side pieces with a handsaw (they were too small to use a jig saw, but I could have used a bandsaw if I owned one. Then, I drilled the holes.
The most difficult part of the construction is drilling the holes for the fan. I used a drill press with a fence and a stop on the fence. If you don't have a fence, you can clamp a straight edged piece of lumber to the drill press for a fence and clamp a block to the "fence" for a stop block. I started by positioning the fence and the block to drill a hole directly in the center of the wood pieces (I stacked the front and back together for drilling). I placed a 1/2 inch piece of scrap wood between the stop block and the front/back. This allowed me to drill the next hole 1/2 inch over. I lowered the bit back into the hole, removed the lumber and adjusted the stop block until I had gone across. I repeated until I had a cross centered on the front and back. I used the holes in the cross, fence, stop block, and scrap piece to space the remaining holes. Next, I sanded the pieces down. Then, I glued them together except for the back. I clamped the sides and top and bottom together until the glue dried. Then, I filed and sanded the edges of the sides flush with the top, bottom, front, and back. Next, I sanded the entire enclosure and then stained. You can repeat the sanding and staining until you get the desired finish. I was lazy, so I just used 200 grit sand paper and stained it once. Finally, I wired and installed the fan, rocker switch, power cord, and rubber feet. Then, I added the carbon filter, put screwed the back on and tried it out. If you decide to build one for yourself, I wish you good luck. I had fun making my own. File for Download
Includes a description, schematics (TinyCAD and PDF), and mechanical construction (SketchUp and PDF).
|
Projects | ||||||||

|
Content on this site is licensed under a Creative Commons Attribution 4.0 License.
I hope the information here is useful to those that find it. Page last update 2016 Nov 15. |
